
04.3 / CDS User Guide
Create and manage
material records.
A practical guide to adding, editing, organizing, duplicating, and safely deleting materials.
06.1 Manuals · read online, preview or download →
Current Workbench, reference editions and downloads
Use the online User Guide for current controls, the released model directory for selectable models and compatibility, and the Training Manual for connected exercises. Wider theory references do not mean every formulation is enabled in Workbench.
Screenshots and download editions carry revision dates; consult the current chapter for updated Workbench instructions. Find the overview PDF, guides and exercise databases in Your CDS library.
138 exercises, examples and case studies → · Your CDS library: overview, manuals and database downloads →
Material controls and selectors
The Materials tab edits identity, provenance, elastic, strength, thermal, moisture, cure and other class-specific fields. Locks protect individual values; group headings organize properties; source panels retain import evidence. Tree and dropdown stars promote favorites without changing the material record.

Step-by-step instructions · 5 steps
- Create adds a record to the chosen material class; Duplicate creates independent named copies; Rename turns automatic naming off for that record.
- Move changes the virtual material class used by filters and compatible selectors. Italic tree text identifies special/favorite materials.
- The search, All/current/favorites visibility menu and material-class filter change what is shown, not what exists.
- Right-click a field for bounds, default and increment where supported. Right-click a record for open, favorite, move, duplicate, export and delete actions.
- Selectors normally restrict fibers, polymers and other roles to compatible classes. Choose the offered all-material scope only when the model permits it; favorites remain listed first.
Export an FEA material card
Select a material in the tree, then choose Material → Export FEA material card and select the target solver.
Step-by-step instructions · 4 steps
- Choose Abaqus, ANSYS Mechanical APDL, MSC / NX Nastran, Altair OptiStruct, LS-DYNA, CalculiX or solver-neutral JSON.
- The export uses the selected material’s elastic properties and SI units. Read the card comments for missing properties and representation limits; do not assume every material is valid for every element formulation.
- Check the solver’s material axes, density, shell/solid formulation and required constants before importing. These are material cards, not a mesh, load case or complete finite-element model.
- For effective Micro or membrane-equivalent laminate cards, use the corresponding results panel’s Solver cards menu. Through-thickness laminate properties are not inferred.
Research and import materials with ChatGPT
In Workbench, choose Material → Find / Import with AI. This is a local review workflow, not an automatic web-search or PDF-extraction service inside CDS.
Step-by-step instructions · 7 steps
- Enter the grades or properties you need and copy the research prompt. Paste it into ChatGPT, using manufacturer datasheets or primary publications. Attach private documents there only if you intend to share them with that service.
- Download the JSON template if needed. Bring the structured JSON response back to Workbench through Choose research JSON or paste it and select Load JSON for review.
- Optionally attach up to three local PDF, PNG or JPEG datasheets for comparison. They are not uploaded or automatically extracted. A manual review card is available for direct entry.
- Review material identity, constitutive symmetry, original and converted units, each source document and page/table, and test conditions. Correct or deselect unsupported values. Keep different temperatures, cure states and product forms in separate records.
- Select the properties you verified. Conflicting values require choosing one per property. Unknown values are not converted to zero; estimated values require explicit opt-in.
- Choose an existing material folder or create an import class. Confirm the review acknowledgement, then import new records. Existing materials are never overwritten.
- Expand Imported property sources in the material source panel to review original values and references. Later edits are marked as changed relative to the import snapshot. Save the workspace as CDS_DB to retain the new records.
Add materials
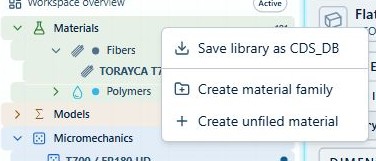
Right-click Materials or an allowed material folder and choose Create. Enter a clear title and select the material class so the record appears in the correct virtual folder.
Step-by-step instructions · 4 steps
- Choose Fiber, Polymer, Metal, Elastomer, or Core & Filler.
- Enter source and identification details. See screenshot
- Populate the applicable property groups. See screenshot
- Save the new record and verify its folder classification. See screenshot
Edit property values
The material editor uses compact rows for variable ID, descriptor, value, units, and lock state. Hover over truncated descriptors for the full meaning.
Step-by-step instructions · 5 steps
- Click the lock to enable editing. See screenshot
- Enter numeric values only in numeric fields. See screenshot
- Confirm units before leaving the row. See screenshot
- Use the value slider for bounded adjustments. See screenshot
- Right-click a value to set lower bound, upper bound, default, and increment jump.
Move and organize materials
Create virtual folders to match suppliers, programs, material families, or qualification status. Moving a material changes its working classification for later selection filters.
Step-by-step instructions · 4 steps
- Create a virtual folder under Materials. See screenshot
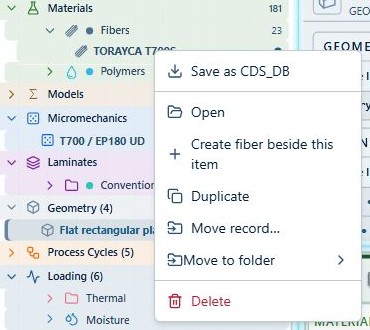
- Right-click a record and choose Move to folder.
- Confirm the destination.
- Use the material-folder filter to verify the new organization.
Duplicate and delete records
Duplicate is the safest starting point for a related material. Delete removes an eligible user record only after dependency review.
Step-by-step instructions · 4 steps
- Right-click the record. See screenshot
- Choose Duplicate and immediately rename the copy. See screenshot
- For deletion, review every downstream lamina, laminate, or simulation dependency shown in the warning.
- Cancel if the record is still required; otherwise confirm deletion.
Use right-click options
Context menus provide the same record actions available through Project Manager: create, duplicate, rename, move, save, export, and delete. Parent-level actions apply to the selected subtree where supported.
Step-by-step instructions · 4 steps
- Right-click the exact record or parent folder you intend to affect. See screenshot
- Read the scope shown in the menu. See screenshot
- Use Save Data or local database export when a portable copy is needed. See screenshot
- Check dependency warnings before destructive actions.
Material editor controls
The material chapter owns every control in the material editor: class and source selectors, property-group expanders, value and unit fields, locks, bounds, defaults, increments, source links, zero-term visibility, Save, Duplicate, Move and Delete.
Step-by-step instructions · 4 steps
- Class and folder selectors control organization and later picker filters; they do not change a property value.
- The lock beside a property protects that value from routine editing. Unlock, edit in the displayed unit, review conversion, then relock trusted data.
- Right-click a numeric value to set its lower bound, upper bound, default and increment. These settings guide sliders, parametric studies and optimization; they do not replace physical allowables.
- Show zero terms exposes stored zero-valued fields. Open source follows the cited record. Save commits the current record; Save as CDS_DB creates a portable database artifact.
Material selectors, filters and favorites
Material pickers show favorites first, then compatible classes. Search narrows visible records; Fiber-only limits constituent selection to fiber classes; All materials removes that class restriction while keeping favorites visible.
Step-by-step instructions · 4 steps
- Use the star on a record, multi-selection, or folder to add or remove favorites. Favoriting a folder applies to its current descendants.
- Italic material names identify special or favorite material entries where that convention is shown; the star remains the authoritative favorite indicator.
- A filtered tree changes what is visible, not what is stored. Favorite and multi-select actions apply to the selected visible records only.
- In a constituent picker, choose Fiber-only when the field requires reinforcement screening. Use All materials only when intentionally selecting outside the normal class filter.